Sunday, February 9, 2014

The Plans For The Self Build Camper - Drawing The Blueprints

Building this camper is a custom build. Plans for different caravans around the world exist, but they all had their own style, things that didn't really fit in with how I wanted things to be. 

So building on the idea of a rectangle with curved edges, this very very crude blue print was drawn up:


Yep, in the same way the VW Transporter was drawn on the back of a napkin, the camper was born. Even starting with this simple floor plan, you could really see how things were going to come together. The simple idea of having quarter circles for the corners attached on to the end of the frame would narrow the problems that could be encountered in the future because at the end of the day, it was nothing more that a collection of shapes being put together to make the final design.

This was a simple aspect of the design that a lot of early designs had. Due to the limitations that were often in place for the pressing of steel formations and the need to replicate quickly, early designs were often simple.


Thursday, February 6, 2014

Making a DIY self Build Camper - The Ideas

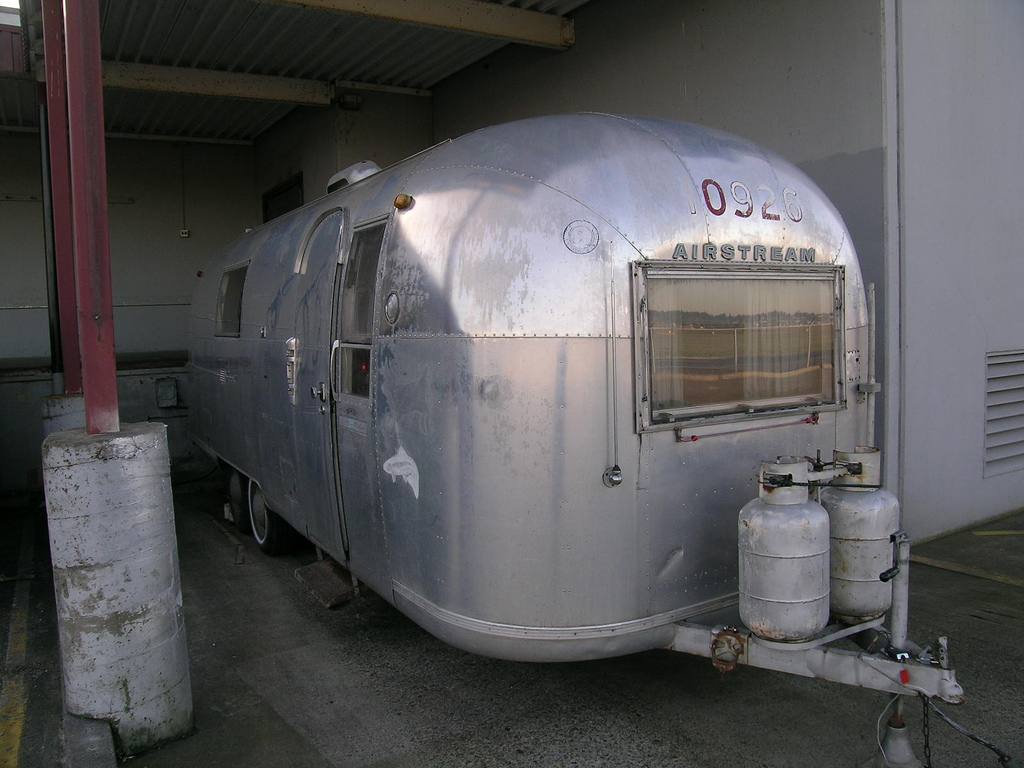
As talked about in the previous posts, the idea for this camper trailer was born from the beauty in the airstream trailer.

For those people who do not know what an airstream is, (e.g. the european people, generally most american people know about airstreams. This is what they look like:


The most iconic element of their airstream is the aluminum shell, that hell or high water will not rust. This has allowed airstreams to last the test of time. Most modern campers and trailers are skinned in an aluminum shell for this exact reason. The frame inside these however is often to up the company making it, sometimes they are wood and others they are steel or even aluminum.

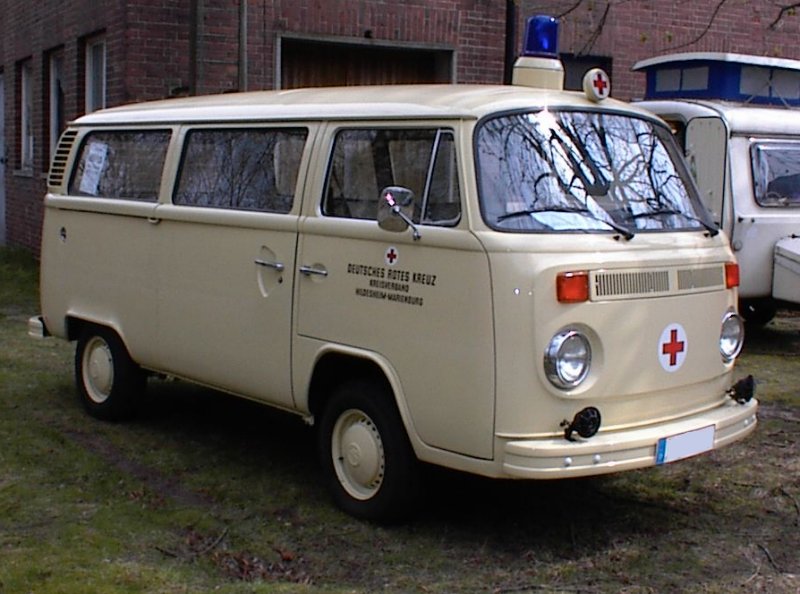
The Type 2 VW has also got curves, a popular choice around the 1970s and further back to the 1950s as seen below in ambulance form:


The idea of making a DIY camper, is all about doing things your own way. So for that reason this project will be a hybrid of both of these two icons of camping. Given that a trailer has been bought, it settles the issues on how wide or long the camper is going to be, which can often be a big time waster as there is always arguments for a little bit bigger or a little bit smaller.

Some key facts in this trailer however are:

  • There will be no permanent cooking facilities.
  • There will be no water facilities, everything will be done in buckets and with bottles (or tanks) of water.
The reasons behind this are quite simple. While I had the last camper, I never actually filled up the water container as bottled water was always cheap and easily to transport. The idea of sending all of the waste water into a barrel did not really appeal to me as I knew I was going to empty it in time, so all washing was usually done in a bucket outside!

The new camper will be mainly cupboard space, as it was always needed and desk space because when cooking or making some tea, having the desk space was always a premium.

All of these little factors are something that have been learned with the experience of hardened campervanning.

One final deal breaker, was to make all cupboards easily accessible and this goes for under bed storage as well. Nothing was more difficult than trying to reach a bag under your bed at 3am in the morning. Easy access makes for better camping!


Wednesday, February 5, 2014

Take Cover! Take Cover! - The Week The Rain Started to Hit


In the month of december it is always cold and I am fine with that. But as soon as rain enters into the situation, it is a completely different story. Rain can make anything more miserable, specifically if you don't have any from of a cover or tarpaulin.

During January, I spend must time grinding quickly, paining quickly and then waiting in all hope that it would not rain. 9 out of 10 times, we got away with it and nothing too bad ever happened. Apart from the odd rain drop shaped blotch on the paint.

During this time, I managed to get the new 4x3 cross members put into place and they were first hole drilled in, and a coach bolt was then hammered in and finally tightened with a 13mm socket.

This process was repeated 18 times in total, two bolts per end.

Then The Rain Really Hit

The country has gone onto high alert and that sent a pulse straight to my project thinking what do I need to do that will keep this rusty and half painted frame dry for another week or two. I managed to find some cloths in the garage that did just about the right trick. But soon they were not good enough.

I came across an english site called Tarpaulins-direct, which offered pretty good looking tarps at a great price, so in my late night slummed state I went ahead and bought the biggest forrest green tarp I could fined... And damn was I happy to have it.

On the first night of the storm, all bungie cords were taken out, and bricks where thrown across the tarp to keep it down. This winds got faster and quickly blew all this away. A plan B was needed.

 The pools of water nicely built up on the tarp.

I placed an other with my brother to get me a 100ft piece of rope, and we were going to go around the entire trailer a few times and tie it down nice and safe. This time, it did work.


What To Do With A Rusted Trailer - How Not To Throw It Away

Once all the wood had been removed, we were then left with a rusted metal frame. By rust I mean rust. Not that it had holes in it, that would be pretty unsafe, but it did have a good film of rust that could pose as paint if you looked at it from the right angle.

Something had to be done about the rust...

I first attempted to use a brass bristle brush, which is put into an electric drill. After a good few combs across the surface and very little of the rust removed (more just of the paint removed). I knew it was time to move into the bigger guns.

My personal motto when it comes to DIY has always been "when in doubt, get the angle grinder out" and in this case it was no exception. With a grinder, a collection of grinding disks, mask, eye protection (no way I ever want to go blind from my own stupidity as getting metal filings in me eyes) and I got down to it.

The cycle can be seen as:

  • Grind
  • Grind more
  • Grind even more
  • Have a cup of tea
  • Grind more
One this was done, I would then clean up the area with a rag to get as much of the surface dust off as possible and get it ready for a bit of paint.

Their was one night however, where due to rain I left some of the metal bare. Anyone with metal working experience would know that:

Bare Metal + time = Rust

So once again, the cycle needed to be repeated to get the last layer of rust off and it was time to get down to it with some red oxide paint (i've been told will keep the rust from getting to out of control). Nice thick paint, that takes the metal very well.


A strong contrast can be seen between the old rusted bits which have not been grinded and the new grinded+painted sections.
 The picture below, shows the whole metal frame really looking well. The left and right horizontal metal frame sections were actually galvanized, so no major work was needed on them.


The one thing you may have seen is that the wheel are off the trailer.

Where did the wheels go?

As a sort of anti theft device, we took the four wheels off. I have not had much experience with old wheels on axels, as most of my time is spend with newer cars. Those wheels did NOT want to come off without a fight.

The frame was propped up on blocks, and the crowbar was once again brought out to show its service to the cause. After about an hour of oiling, with my favorite WD-40 and a lot of smacking and bending, they did eventually come off.


Who knows what is next!

So I Bought A Trailer.. How Much Work Will It Be To Build A Camper?

As described in the previous post, the main issue with this project was that I wanted it to be done on a budget, a real budget. The concept of buying a camper of any sorts didn't appeal to me, because nothing really suited my taste.

I really liked the iconic 1950s air stream, the body looked right, great curves and well crafted.. but it didn't have the connection to the styles of the early bay window VW that I originally tried to recreate with my VW Transporter idea. Enter the trailer: 


The previous owner had told me it was used as a car transporter of sorts, its about 10ft or so long, and about 6 foot wide. Really wide wheelbase which was perfect.

 It also came with four tires, in pretty bad condition. Cracks all around, bald as far as the eye can see and a hazard in all forms. This was something that would need to be addressed in the future.

Before I could get on with building what I had in my mind, the very first thing that needed to go was the wood. It was old, oily and water logged. Not a good way to start any sort of future project. I pulled out the jigsaw, my preferred tool of choice and got down to work.


The first to go was the lengths of wood running from the front to back. These cut off quite quickly without any hassle and just left behind the horizontal 4x3 inch cross members. These were not actually secured in by any great means, just held in by their own weight and pressure. A few quick smacks with a sledgehammer and a crow bar, and we were back in action. 

I was left with a nice, rusted frame. What a better way to start any project.

Tuesday, February 4, 2014

Where Do We Start? Self Build / Self Built DIY Camper Trailer - The Journey So Far.

Building a DIY Campervan

Where do we begin?. It all started a number of years ago, the idea of getting a camper van and getting onto the road and seeing what the world had to offer. Quite quickly, anyone with a limited budget will see that the idea of getting hold of a camper is not that easy of a feat!

Everyone wants a 79 westfalia camper, they look great. The main problem with this is that they are very very old. With age, comes rust.. The idea of getting a camper is any great condition was going to be an investment of 5000 - 10000 euro easy, and who knows what the outcome would be.

As a solution to this, I moved towards the idea of buying a VW Transporter, 2004 to be exact. A long wheel base van would provide more than enough space to fit my bed into along with a host of other features that would be needed.

The idea of getting a van onto the road, for someone who doesn't really need a van causes one heck of an issue for insurance. In short they do not want to know about it. Different counties have different rules, but in short the point was clear. If you want a van on the road for non commercial purposes, it would have to be a campervan legally and tax had to be paid, 1005 euro to be exact.

Well then, I had to get this van into a campervan as soon as possible.

The rules of building a campervan, to keep the insurance people happy
A number of different regulations had to be adhered to for the van to be considered a campervan, the main of which were:


  • Vent holes in the side of the van to allow any stray gas get outside
  • Copper pipes going up to a gas cooker, not rubber
  • A guard around the cooker, to stop the back of the seats from melting
  • A bed that pops out of the walls somehow
  • No tables that can fly around the place. Everything had to be perfectly mounted and not become a hazard in the event of a crash.
All sounded perfect, and generally went to plan. A colour scheme was picked and the painter went ahead and painted the van. A window was cut into the side of the van and everything looked perfect.


And then:

  • The turbo for the TDI engine broke
  • Bits flew into the engine
  • The engine exploded, sending a 40 foot wall of smoke shooting down the road
  • Oil was everywhere
  • Vicky the van, was dead.

RIP Vicky 2011-2013
After two short years, about 5 camping trips and more time on blocks and in a garage than previously expected, it all lead to the simple conclusion that the van needed to be sold.

On the back of this, a new project needed to be undertaken. This is the short version at least. And so, the future dream of a camper was put on hold until a new plan would come together.

Engines, were out. Trailers were in. 

The cost of running a campervan as much as I loved them, were a little too much. The part about enjoying the camper beside the beach or at a lake side was long gone after a number of deadlines were missed and the idea of going to France was just a botched plan.

In light of this, a trailer was purchased with the idea of building a DIY camper trailer. A trailer as in a metal frame with two axels in very very poor condition, with the idea of building a caravan, (or camper trailer or whichever the term is for campers without an engine in the US).


This blog will cover the project to date so far, showing, from the ground up, all of the steps that were taken. All hurdles will be described as they come into sight.

Until next time,
Kyle.