Showing posts with label how to make a camper van. Show all posts

Thursday, April 10, 2014

Things Are Starting to Take Shape - Caravan Getting Height

When working on any project, the greatest moment is when things begin to visually come together. With this project it was no different. After working on the floor for a few weeks, it was time to move upwards and see what some height was going to make it look like. From the very beginning, the visual impact was always at the front of this project, it had to look right. Like a piece of art it was taking shape the way I had visioned, well, maybe through my eyes only.

A simple rule of two thirds of the height to the bottom line of the camper and one third to the top of the camper was going to be the plan. The camper was sitting on concrete blocks for a few months so it was finally time to break out the old (and rusted up) wheels and see what it would look like when it was put together.

It is hard to say that it has a face that only a mother could love, but so far I think it is perfect! With a little squinting it had the shape and dimensions I have been looking for. The springs on the chassis are heavy duty leaf springs, which give a very bouncy feel to the whole camper. Once things start to get going some corner leveling jacks will be needed to keep it from rocking around too much.

On the front of the chassis, a jockey wheel which is used to take the balance at the front during the process of hitching and de-hitching was long gone when I bought it. This will need to be replaced during the coming weeks.

Working outside has serious draw backs, the weather can be very bad which has caused for a lot of lost time. Other factors play a part such as pulling out tools and putting them all away again, opening and locking up the plethora of garage doors and jumping in and out of the camper at strange angles. To date, the back of the camper has not had any sort of reinforcements put in as there would be no other way to get around it when it is pulled fully back into the parking spot.

A quick look at the back of the camper:


A side profile of the camper, covered in a cheap EverBuild brand blue tarp and a higher quality olive drab tarp which was bought from Tarpaulins Direct. I must give them credit, they were fast and efficient and would without a doubt use them again in the future. 


The ground at the side of the house, covered in old oil stains from the last project and now getting covered in sawdust.


Looking beautiful as always!

So the shopping list has grown to, new wheels, new tyres, jockey wheel for the front, some stabilizer legs for the corners and more 2x3 inch wood for reinforcement. 


Until next time, more framing will be done pulling the whole project together.

Monday, February 10, 2014

Taking a Look Into The Future - How We Have To Make This DIY Camper Build Look Great!

When building anything all of the decisions are left up to you. But sometimes we can get a little lazy. A recent video that was put out by the YouTuber Wranglerstar, talked about a young kid and how the kid wrote into him to tell him how he didn't cut corners when cleaning snow from under a car.

This approach really shows us, that deep down we are always trying to get ahead and cut the corners so we can get to the next task.

But what does this have to do with the design of a camper I hear you say? Lots! It can be really easy for some bits of wood that are a 1 or 2mm out to be left by the side and forget about them. But when you come back in the future you are always glad that you took that little bit more time to deal with the issue.

Ever Worked on Auto Body?

During my limited experience with auto body work I noticed one thing. This one thing should be hung above the painting booth in a workshop and given as introductory notes for new comers:

It all comes through the paint!


Something that you may think looks about right and you decide to speed up the process and get painting. Well as soon as the paint has begun to dry, your heart can then begin to settle also as you know those lines you saw before you painted are still there!.

How do we get around these problems? They are generally quite simple, finer grade sandpaper (good old wet and dry sandpaper) and then progressively move to a finer grade as time processes until all the marks are gone. During this process, using a high build primer would be a great option, as they add an extra thick layer for you.


To Bring This Back To My Camper

The top half and bottom half of the camper are going to be separated the two lines of different colours that meet together. I had a little idea spark off and thought wouldn't it be great if I could get some of the table trim from Eddie Rocket's Diner tables. It was about 2 inches wide, and would make a great band around the van to separate the colours.

I've found some nice US suppliers who have a wide range, and some others sourcing from here in Europe. Hopefully we can get these in time (and chromed) for the deadline. It is the attention to all of these details however, that make it all come together and look the best.


Sunday, February 9, 2014

Winterizing Your Camper - Some Thoughts On Keeping Your Camper Warm

When starting a camper project from the very beginning, the conditions that the camper will be used in need to be considered. In the US, the temperature can go from sweating hot, to bone chattering cold between seasons. Here in the west of Europe, things are a little different.

We quite often get a middle range of temperatures, things never get too hot, or really go too cold. So an approach to this needs to be taken during the construction process of the camper.

Typically campers here do not have very thick walls. The same can be said for most vans and campervans that are currently on the market today. They are usually created for the good seasons, as people rarely go out on holiday in the winter months. But some people do!

The insulation in the camper can then suddenly be inadequate and warm days suddenly come with really cold nights. Preventing this from happening needed a lot of thought.

At the moment, the walls in the camper are currently pegged at being about two inches thick. This will give plenty of space for a two inch thick insulation, or 50mm for us European people, to be added in.

One of the recent advents in the insulation world was creation of polyiso insulation, or "rigid foam" as it is often known.

Unlike polystyrene insulation (the white stuff) you would have seen used throughout the 80's and 90's, polyiso insulation is denser and often covered in a foil film offering better insulation. To ensure a good seal, a foil type tape is available to seal up the gaps.

Where Your Camper Loses Heat

People often wonder about campers and where all of the heat is really lost. It can be seen from a number of different angles. Below is a breakdown of where your heat goes!


  1. The floor of an RV or a camper is often made from some wood or floor pan sheet metal that has been added to the chassis frame. In a lot of cases, that is really it! Although heat rises, a cold floor can quite quickly turn your hot air into cold cold air.

    By insulating the floor, we can reduce the risk of losing heat out of the floor. The wind gap underneath the camper or RV is also an issue. Because the floor is raised up and a gap of anywhere between 10-14 inches is there, cold air can easily flow in under the camper. To prevent this draught from happening, people have often moved towards the idea of creating a skirt around the camper. This can stop the flow of cold air under the camper.
  2. The roof of the camper again, like the walls needs to be insulated. If all the hot air is hitting your roof, you need to ensure that it is not a cold metal surface that can turn your expensive hot air into cold air.
  3. Windows and doors although useful during the day if left open at night can becoming gaping air holes allowing all your precious hot air to flow out. Do not block up your vents however, they are needed for safety!


Heater Strips
If you have external water sources, one product that is on the market are heater strips designed to go around your pipes. They require a very low voltage and keep your pipes just above freezing to keep the water flowing, preventing cracks and leaks.

This solution however, can be costly to power if you are running on a solar rig.


In conclusion, as soon as the camper outside plywood has been added, it is insulation time!


A nice comparison of insulations can be found here
For a little bit more about polyiso insulation, check out here

The Walls Were Added To The Camper - And The Rain Returned

Now that the floor was added the most interesting part was about to start. The walls create realistic dividing lines in the camper and allow you to see what the space is really going to look like. Seeing it all down on paper is always just one perspective, really being able to climb inside is always the most valuable.

To get started, 2x3 inch wood was added to the four corner posts. Simple L brackets were used, with some three inch long screws to secure them in place. These, are pretty shaky by themselves so the next important part was to add the securing braces between them. The wood running between them was 2x2 inch timber when secured in place with some L brackets really pulled it all together.

The picture below shows a look from the inside:


The rain, once again started off so there was a really quick rush to get the tarp on top once again. All the rope and bungee chords that could be found were used to secure all of the eyelet holes on the tarp in place. The rain is always a small percentage of the problem, the wind is usually is what pulls the tarp off.

Looking in from the very front of the camper, the size really becomes visible. Some temporary diagonal pieces were added to hold the frame in place for the week, before it could be fully secured. The beautiful red anti-rust paint can be seen a mile away on the trailer. It sort of adds a kind of character to the trailer already... sort of.


This rectangle frame, was 3ft 6inches tall, and runs the whole way around the camper. This is the dividing line between the bottom half of the camper and the top half of the camper, which has a tilted in design as can be seen on the VW campers. Now that the frame is in place, the next step will be adding additional strengthening pieces to make sure the all of the walls stay put.

To the very front left of the camper, a space about 2 foot wide is where the door will eventually be placed.

The Tools For Building The Camper

Before any project begins, it is always a good practice to see what tools you are working with to make sure that you don't go running out looking for things when you really need them. So far my favourite tool has always been the angle grinder, as it is a single solution for any metal related problems that happen along the way. 

Apart from this, the usual tape measure, hand saw and plenty of screws are all that have been used oh, and a circular table saw!

Although technology has evolved and the process of using electrical saws has been around for years, this was the first project where I actually used one. Due to the amount of cuts that were needed, the idea of the electrical saw just seemed better. This actually speeded the process of erecting the frames so much quicker, although the saws are 100% more dangerous than anything you operate with your own power like a hand saw as they can quickly take your fingers off.

So far we have been lucky and no injuries have been sustained.


Adding The Floor Into The Camper


Given the very simple blueprint that was drawn up, the next step was the floor. With a bad floor, the whole camper would pretty much come apart over time, so a little bit of thought was needed to ensure the maximum strength was in it.

A width of 2 meters, which is about 6ft 6 inches are decided for the total width of the camper. This means that no matter what happens, we can never exceed this. There was a few little tricky bits along the way that are often forgotten about during the design phase. The most important of these was where the wheels and the axels come into play with the floor. Room needed to be available so the wheels can be added and removed easily from the axels, without interfering with the floor or the wall panels.

Nine cross members, created from 2x3 inch rough finish wood were added into the floor, which were spaced roughly 14 inches apart. Whenever a piece of floor steel was available, that was where the cross member went in. Between these extra bits were added between them to stitch them all together.

In the picture above you can see a length of wood down the left side, which was added as a temporary measure to hold the whole frame together as all of the extra stitching pieces were added. The zig zag formation was added to avoid allow the extra ends of the cross members to be trimmed off where needed to make space for the wood. At the very front of the frame, and at the very end, perfect triangles can be seen as no obstructions were in place preventing them from being joined.

Thursday, February 6, 2014

Making a DIY self Build Camper - The Ideas

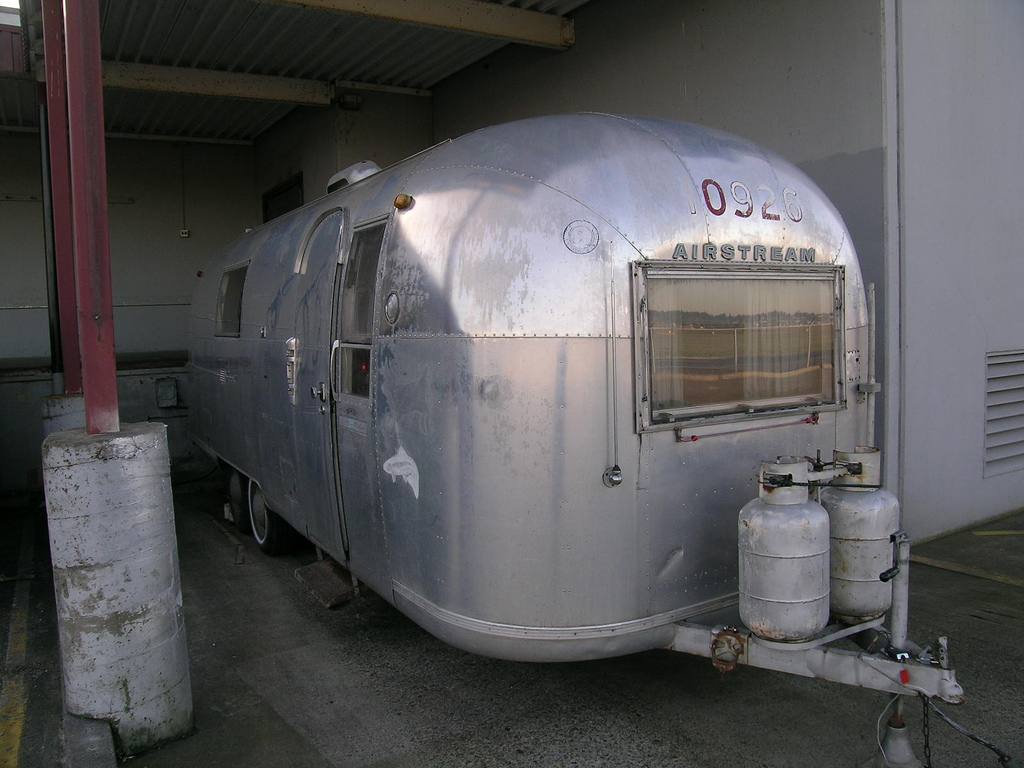
As talked about in the previous posts, the idea for this camper trailer was born from the beauty in the airstream trailer.

For those people who do not know what an airstream is, (e.g. the european people, generally most american people know about airstreams. This is what they look like:


The most iconic element of their airstream is the aluminum shell, that hell or high water will not rust. This has allowed airstreams to last the test of time. Most modern campers and trailers are skinned in an aluminum shell for this exact reason. The frame inside these however is often to up the company making it, sometimes they are wood and others they are steel or even aluminum.

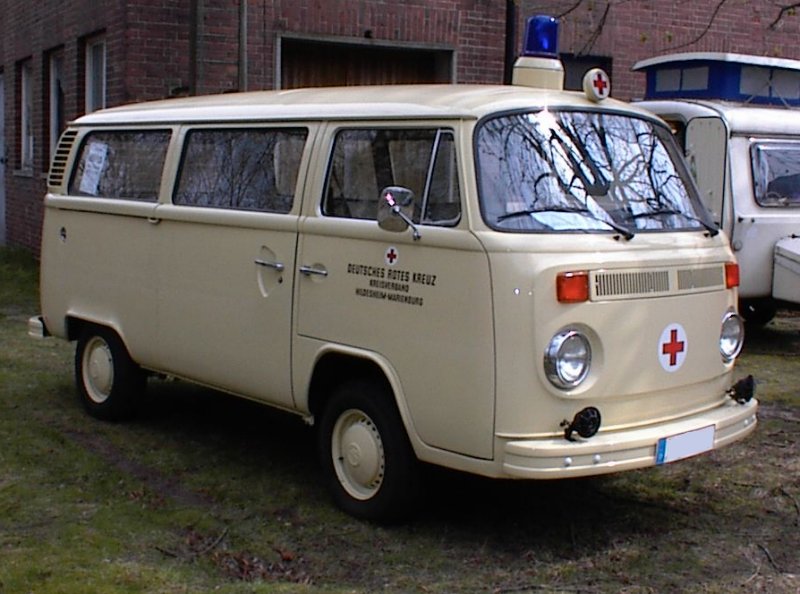
The Type 2 VW has also got curves, a popular choice around the 1970s and further back to the 1950s as seen below in ambulance form:


The idea of making a DIY camper, is all about doing things your own way. So for that reason this project will be a hybrid of both of these two icons of camping. Given that a trailer has been bought, it settles the issues on how wide or long the camper is going to be, which can often be a big time waster as there is always arguments for a little bit bigger or a little bit smaller.

Some key facts in this trailer however are:

  • There will be no permanent cooking facilities.
  • There will be no water facilities, everything will be done in buckets and with bottles (or tanks) of water.
The reasons behind this are quite simple. While I had the last camper, I never actually filled up the water container as bottled water was always cheap and easily to transport. The idea of sending all of the waste water into a barrel did not really appeal to me as I knew I was going to empty it in time, so all washing was usually done in a bucket outside!

The new camper will be mainly cupboard space, as it was always needed and desk space because when cooking or making some tea, having the desk space was always a premium.

All of these little factors are something that have been learned with the experience of hardened campervanning.

One final deal breaker, was to make all cupboards easily accessible and this goes for under bed storage as well. Nothing was more difficult than trying to reach a bag under your bed at 3am in the morning. Easy access makes for better camping!